Few things are more frustrating than stepping into the shower and realizing there's no hot water. When your water heater stops producing hot water, it can disrupt your daily routine and indicate that something's wrong with the system. Fortunately, there are several possible causes — and most can be diagnosed with a little troubleshooting.
1. Identify the Type of Water Heater You Have
Before diving into troubleshooting, it's important to know what kind of water heater you're working with. There are two main types:
Electric Water Heater: Uses electric heating elements to warm water.
Gas Water Heater: Uses a gas burner and pilot light to heat water.
The troubleshooting steps differ depending on the type you have, so take a moment to identify yours. You can check for a gas line or look for an electrical connection near the tank.
2. Check for Power Supply Issues (Electric Water Heaters)
If your electric water heater suddenly stops producing hot water, the first thing to check is whether it's getting power.
Step 1: Check the Circuit Breaker
Go to your home's electrical panel and look for the breaker labeled “Water Heater.” If it's tripped, switch it off completely and then back on. Sometimes, a surge or overload can trip the breaker and cut power to your heater.
Step 2: Check the Reset Button
Your electric water heater has a built-in reset button located near the upper thermostat behind an access panel.
Turn off the power to the heater.
Remove the access panel and press the red “Reset” button.
If the water heater turns on afterward, a temporary electrical issue might have caused it to trip.
If the breaker or reset button continues to trip frequently, it could indicate a deeper issue, such as a faulty thermostat or heating element.
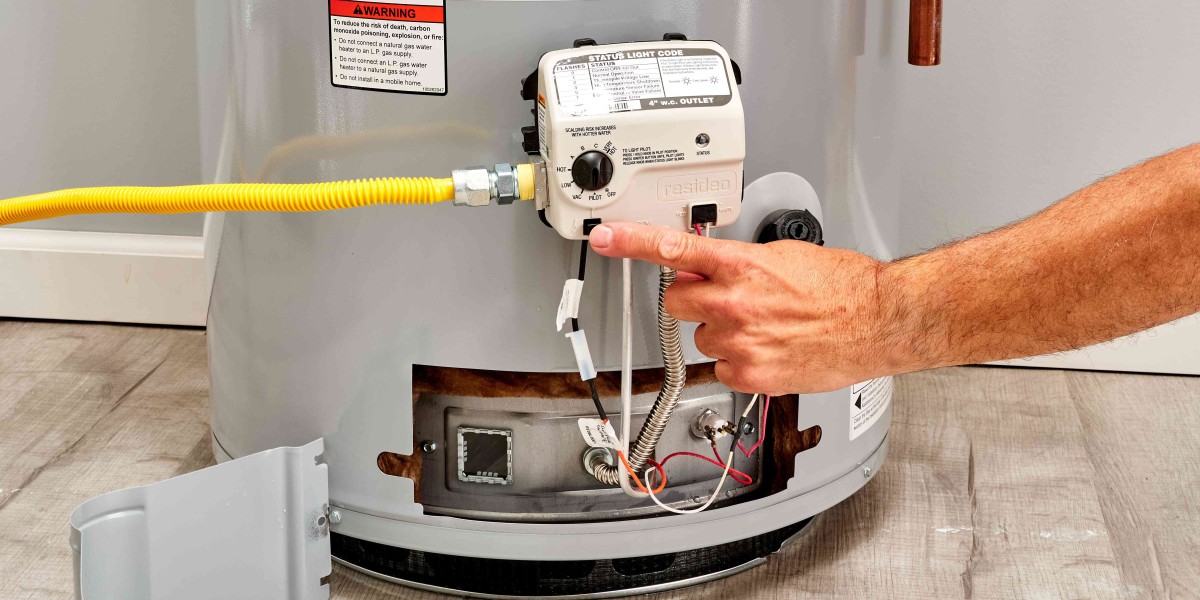
3. Check the Pilot Light and Gas Supply (Gas Water Heaters)
For gas water heaters, the lack of hot water could be due to the pilot light going out or an issue with the gas supply.
Step 1: Inspect the Pilot Light
The pilot light is a small flame that ignites the gas burner.
Remove the access cover at the bottom of the heater.
If you don’t see a flame, the pilot light is out.
Most modern gas heaters have electronic ignition, while older models use a manual pilot light. Follow the manufacturer’s instructions to relight it safely — usually involving turning the gas control knob to “Pilot,” pressing it down, and lighting with a match or igniter.
Safety Tip: If you smell gas, do not try to relight the pilot. Turn off the gas supply and call your gas company or a licensed plumber immediately.
Step 2: Check the Gas Supply
Make sure the gas valve is open and the gas supply to your home is active. If other gas appliances (like your stove) aren’t working either, the issue might be with your gas service.
4. Inspect the Thermostat Settings
Sometimes, the fix is as simple as adjusting the temperature settings.
Both electric and gas water heaters have thermostats that control water temperature.
For most homes, the recommended setting is 120°F (49°C).
If the setting is too low, you may not get sufficient hot water.
Turn off the power before adjusting the thermostat and avoid setting it above 130°F to prevent scalding.
If adjusting the thermostat doesn’t help, the thermostat itself could be faulty and may need replacement.
5. Test the Heating Elements (Electric Models)
Electric water heaters use two heating elements (upper and lower) to warm the water. If one burns out, you may end up with lukewarm or cold water.
To test this:
Turn off the power at the breaker.
Remove the access panels and insulation.
Use a multimeter to check the continuity of the elements.
If an element shows no continuity, it’s burned out and needs replacing. Heating elements are relatively inexpensive and can be replaced by a professional plumber.
6. Check for Sediment Buildup
Over time, minerals in your water can settle at the bottom of the tank, forming a sediment layer that interferes with heating efficiency.
This is a common issue in areas with hard water.
Signs of sediment buildup include:
Popping or rumbling noises from the tank
Inconsistent water temperature
Cloudy or rusty hot water
To fix it, the tank should be flushed :
Turn off power or gas supply.
Attach a garden hose to the drain valve.
Drain the water until it runs clear.
Refill and restart the system.
Experts recommend flushing your tank once a year to prevent sediment-related problems.
7. Look for Leaks or Water Damage
If your water heater is leaking, it may not be able to maintain enough water to heat properly.
Common leak points include:
The drain valve
The temperature and pressure (T&P) relief valve
The tank itself (due to corrosion or age)
If the tank is leaking , it's usually beyond repair and will need replacement. You can tighten loose valves, but for major leaks, call a professional immediately to avoid water damage.
8. Check for Frozen Pipes (in Winter Months)
If you live in a cold region, frozen pipes could be restricting the flow of hot water.
Inspect the pipes leading to and from your heater for frost or bulges.
You can try gently warming them using a hairdryer or heat tape — but never use an open flame . Once thawed, insulate the pipes to prevent future freezing.
9. Consider the Age of Your Water Heater
Even with proper maintenance, water heaters don't last forever.
Traditional tank models usually last 8–12 years.
Tankless models can last 15–20 years with regular service.
If your heater is nearing or past its expected lifespan, loss of hot water could be a sign it's time for a replacement rather than a repair. An old or corroded tank is often less energy-efficient and more prone to failure.
10. When to Call a Professional Plumber
If you've gone through the above steps and your water heater still isn't working, it's time to bring in a licensed plumber or water heater specialist.
Call a professional if:
The circuit breaker or reset button keeps tripping.
You smell gas or suspect a gas leak.
There's visible rust, corrosion, or a leaking tank.
The heating elements or thermostat need replacement.
You're not comfortable handling electrical or gas components.
A professional can perform a complete inspection, test components with specialized tools, and ensure your system operates safely and efficiently.
11. Preventing Future Water Heater Problems
Regular maintenance is the key to keeping your Water Heater Inspection in Ardrossan working smoothly. Here are a few tips to extend its life and avoid sudden breakdowns:
Flush the tank annually to remove sediment buildup.
Inspect the anode rod every 2–3 years and replace it if it's corroded.
Test the T&P valve periodically to ensure it's functioning properly.
Adjust the thermostat to a safe and efficient temperature (around 120°F).
Check for leaks and corrosion regularly.
By following a routine maintenance schedule, you can prevent most water heater issues before they turn into major problems.
Final Thoughts
A water heater that's not producing hot water doesn't always mean you need a new one — often, it's a simple issue like a tripped breaker, pilot light outage, or sediment buildup. However, ignoring the problem can lead to more serious damage or costly repairs down the line.
By following the steps in this guide, you can troubleshoot common issues and identify when it's time to call a professional. Regular maintenance, timely inspections, and understanding how your water heater works are the best ways to ensure a steady supply of hot water year-round.
For More Details: https://kingstreeplumbing.ca/