

How to Prepare Subfloor for Laminate in Moisture-Prone Areas
Knowing how to prepare the subfloor for laminate correctly is the foundation of every successful installation and it matters even more in moisture-prone areas. Kitchens, bathrooms, laundry rooms, ground-level slab homes, and basements all present conditions where moisture is a constant factor. Laminate flooring is not waterproof. Its high-density fiberboard core absorbs moisture when the subfloor beneath is inadequately prepared and the result is swelling, warping, buckling, and mold growth that can ruin the floor long before its time. The good news is that with the right testing, leveling, and laminate flooring underlayment selection, you can install laminate confidently even in challenging environments. This guide covers every step in detail.
Why Subfloor Preparation Is Even More Critical in Wet Environments
In a standard dry living space, a poorly prepared subfloor might cause squeaks, unevenness, or premature wear. In a moisture-prone environment, the consequences are more serious. Laminate planks that sit above a damp or uneven subfloor will absorb vapor through their edges and joints over time. That vapor causes the HDF core to swell and the locking joints between planks to lift or crack. Once that process begins it cannot be reversed with surface treatment. The affected planks need to be replaced.
This is why the preparation stage in a wet-area laminate flooring installation is not a step to rush through. Every decision you make before the first plank goes down, from how you test moisture to how you level the surface to which laminate flooring underlayment you choose, directly affects how long your floor will last and how it will look.
It is also important to set clear expectations. Even the best subfloor preparation cannot make laminate fully waterproof. If you are installing in a room with standing water risk, consistent flooding, or wet conditions, a truly waterproof flooring product like luxury vinyl plank is a more appropriate choice. For rooms with manageable moisture and good humidity control, a properly prepared subfloor paired with the right underlayment gives laminate excellent long-term performance.
Step 1: Remove Everything From the Room
Before any testing or preparation can begin the room needs to be completely cleared. Remove all furniture, appliances, existing floor coverings, and baseboards. Take up any old laminate, vinyl, or carpet using appropriate tools and inspect what is left behind.
If there is old adhesive residue from a previous glue-down floor it needs to be scraped off. Any adhesive that creates ridges or high spots will telegraph through your new laminate flooring installation and those bumps become more visible over time. For guidance on removing existing flooring cleanly read How to Remove Laminate Flooring Without Breaking the Planks.
Once the subfloor is bare, sweep and vacuum it thoroughly. You need a completely clean surface to inspect it accurately and to perform moisture testing correctly.
Step 2: Inspect the Subfloor for Structural Problems
Before testing for moisture take a careful look at the physical condition of the subfloor itself. Walk across the entire surface slowly and listen for soft spots, squeaks, or areas that flex under your weight.
For Concrete Subfloors
Look for visible cracks, spalling, crumbling areas, and paint or sealer that is peeling away from the surface. Fine hairline cracks that are stable are generally acceptable and can be filled. Wide or uneven cracks that show movement indicate a structural problem that needs professional evaluation before any flooring is installed.
Check for efflorescence, which appears as a white powdery deposit on the concrete surface. Efflorescence is caused by water carrying dissolved salts through the slab. Its presence on the surface is a clear visual indicator that moisture is moving through the concrete regularly. This must be addressed before installation.
For Plywood or OSB Subfloors
Check for soft spots, rotted areas, or panels that bounce or flex when walked on. Any damaged panels need to be replaced entirely. Inspect the fastening as well. Squeaky subfloors are usually caused by loose panels that are not properly fastened to the joists beneath. Drive additional screws through the subfloor into the joists to eliminate movement before laminate goes down. A subfloor that moves or flexes puts constant stress on laminate locking joints and leads to premature failure.
Look for any staining that suggests previous water intrusion. Dark discoloration or staining on plywood is often mold that has already taken hold. Moldy subfloor material must be treated with an appropriate antimicrobial product or replaced entirely before any flooring is installed over it.
Step 3: Test for Moisture Thoroughly
Moisture testing is the single most important preparation step in any wet-area laminate flooring installation and yet it is the one most commonly skipped. Never assume a subfloor is dry enough based on appearance alone.
Testing Concrete Subfloors
Concrete releases moisture vapor continuously even when it looks and feels completely dry. There are two reliable testing methods.
The plastic sheet test is the simplest approach. Tape a 2-foot by 2-foot piece of clear polyethylene film flat against the concrete using waterproof tape on all four edges. Leave it in place for 24 to 72 hours then lift it and check for condensation on the underside. Any visible moisture droplets or darkening of the concrete beneath indicate active vapor transmission that needs to be addressed.
For more accurate results use a calcium chloride test kit or a relative humidity probe. The calcium chloride test measures how much moisture vapor the slab emits over 60 to 72 hours. Most laminate manufacturers specify a maximum acceptable level, typically around 3 to 5 lbs per 1,000 square feet per 24 hours. Relative humidity probes inserted into drilled holes measure moisture within the slab itself and are the current industry-standard method. An acceptable reading for laminate installations is generally 75% relative humidity or below, though checking the manufacturer's specific guidelines is always recommended.
Testing Plywood or Wood Subfloors
Use a pin-style moisture meter to check the moisture content of the wood directly. Take readings at multiple points across the room. Wood subfloor moisture content should generally be at or below 12% before laminate is installed. In high-humidity regions or ground-level rooms above a crawl space, readings can sometimes be higher and a vapor barrier underlayment becomes even more critical.
If moisture readings are above acceptable levels on a wooden subfloor, identify and correct the source before proceeding. Improving crawl space ventilation, repairing gutters, correcting drainage issues around the foundation, or sealing concrete walls in basements are all possible interventions depending on where the moisture is coming from.
For a detailed look at how moisture barriers work and which products are appropriate for different conditions read The Best Moisture Barrier for Laminate Flooring.
Step 4: Address Moisture Sources Before Installing Anything
Moisture testing tells you what is happening with your subfloor. The next step is doing something about it if the readings are high.
For concrete slabs with elevated moisture readings, apply a penetrating epoxy or urethane moisture mitigation sealer directly to the slab surface. These products cure to form a waterproof membrane that significantly reduces vapor transmission. Allow the sealer to cure fully according to manufacturer instructions before proceeding with underlayment installation. This step is particularly important for basement installations and any ground-floor slab room in a humid climate.
For concrete that shows efflorescence, clean it thoroughly using a stiff brush and a diluted vinegar or efflorescence remover solution. Allow it to dry completely and retest before sealing.
For wooden subfloors with moisture problems, address the source in the building structure rather than simply sealing over the problem. Adding a vapor barrier in the crawl space below, improving foundation ventilation, or repairing exterior water management issues are the right long-term solutions.
Step 5: Level the Subfloor
Laminate flooring requires a flat and level subfloor to perform correctly. Unlike luxury vinyl planks which have some flexibility and tolerates minor irregularities, laminate is rigid. It spans across the subfloor surface and any significant dip or rise translates directly into stress on the locking joints between planks. Over time that stress breaks down the joints and leads to gaps, squeaking, and plank separation.
The standard flatness requirement for laminate flooring installation is no more than 3/16 of an inch variation over a 10-foot span. Use a long straightedge or a 6-foot level to sweep systematically across the entire room and mark any problem areas with chalk.
Filling Low Spots
Low spots on concrete are filled with a self-leveling compound. Mix the compound according to the manufacturer's instructions and pour or trowel it into the low area. Self-leveling compounds flow naturally to fill depressions. Allow it to cure fully, typically 24 hours before proceeding. For deeper voids greater than about half an inch, fill in two or more layers rather than one deep pour.
For plywood subfloors, low spots can be filled with floor patching compound applied with a trowel. Sand smooth once dry.
Correcting High Spots
High spots on concrete must be ground down with a concrete grinder or angle grinder fitted with a grinding disc. This is loud, dusty work but it is essential. Do not attempt to build up surrounding areas to match a high spot since that approach rarely produces a truly flat result and adds unnecessary height.
High spots on plywood subfloors can be sanded down with a belt sander or floor sander. After grinding or sanding, vacuum all dust thoroughly before continuing.
Squeaky or Loose Subfloor Panels
As mentioned earlier, any panels that move or squeak must be secured to the joists before installation. Drive coarse-thread screws every 6 inches along each joist line through the subfloor panel. Pre-drill near panel edges to prevent splitting. This eliminates movement that would otherwise transfer noise and stress into the laminate above.
Step 6: Choose and Install the Right Laminate Flooring Underlayment
The laminate flooring underlayment is not just a comfort layer. In moisture-prone areas it is a critical component of the floor system that protects the HDF core of the laminate from vapor coming up through the subfloor.
What to Look for in a Moisture-Prone Environment
For any room with elevated moisture risk always choose an underlayment that includes an integrated vapor barrier. The vapor barrier layer, typically a polyethylene film, blocks moisture vapor from migrating upward into the laminate. Look for products that specify a permeance rating of 1 perm or lower for the most effective moisture protection in challenging environments.
Standard closed-cell foam underlayment with an attached vapor barrier film is the most common and affordable option for most residential installations over concrete. The foam layer provides cushioning and sound dampening while the attached film handles vapor protection in one product.
For basements or rooms with higher moisture exposure, a thicker polyethylene film of at least 6-mil, or preferably 10-mil, used in combination with a padded underlayment gives you better long-term protection. Some premium combination products use rubber-based padding bonded to a heavy-gauge film for the highest level of moisture resistance alongside superior sound dampening.
Cork underlayment with an integrated moisture barrier is another strong option, particularly if thermal insulation and sound control are priorities alongside moisture protection. Cork is denser than foam and does not compress as easily over time under furniture and foot traffic. For more detail on the different underlayment types and how to choose between them read How the Best Underlayment for LVP Turns a Good Floor Into a Great One since many of the same principles apply to laminate underlayment selection.
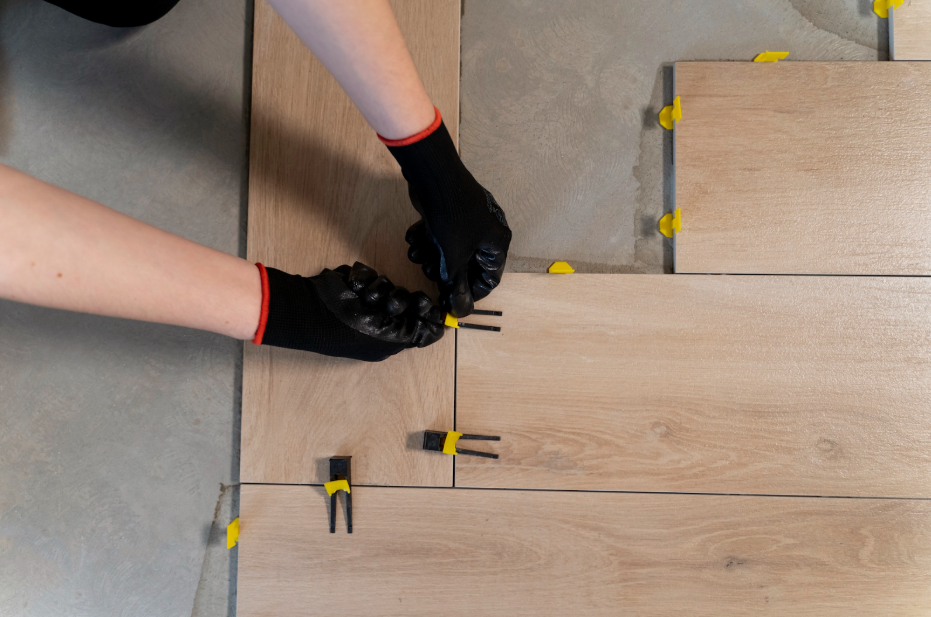
Underlayment Installation Technique
Start the installation at one wall and roll the underlayment out across the room. For foam underlayment, butt each strip edge to edge without overlapping. Overlapping foam creates ridges that show through the finished floor.
If your underlayment is a standalone polyethylene film or a product with a separate film layer, overlap the seams by at least 6 to 8 inches and seal every seam with moisture-resistant tape. Leave no gaps in the coverage. Even a small unsealed seam allows vapor to bypass the barrier and reach the laminate above.
Run the underlayment 2 to 3 inches up each wall to protect the perimeter where moisture can also migrate from the base of the walls. Trim the excess after baseboards are reinstalled. Smooth out any wrinkles or bubbles across the entire surface before the laminate installation begins. Wrinkles in the underlayment create soft spots or ridges that affect both the feel of the finished floor and the stability of the locking joints.
Some laminate flooring products come with an attached underlayment pad bonded to the back of each plank. If your laminate has a pre-attached pad, check the manufacturer's instructions. In some cases an additional separate underlayment is not recommended when a pad is already attached. However a standalone moisture barrier film over concrete is still typically required even when planks have pre-attached padding.
Step 7: Allow the Laminate to Acclimate
Before installation begins the laminate planks themselves need time to adjust to the temperature and humidity of the room they will be installed in. This process is called acclimation and it is important even in moisture-prone areas.
Stack the unopened boxes flat in the room for at least 48 hours before installation. Keep the room at its normal temperature and humidity during this time. The HVAC system should be running as it will be when the room is occupied. Skipping this step in a room with humidity different from where the boxes were stored can lead to planks expanding or contracting post-installation, causing gaps or buckling at the joints.
Step 8: Check Expansion Gap Requirements
One of the most overlooked details in a laminate flooring installation in moisture-prone rooms is the expansion gap. Laminate expands when humidity rises. In a room that regularly experiences humidity changes such as a kitchen or laundry area this movement is more pronounced than in a dry living room.
Always leave the full expansion gap recommended by the manufacturer, typically 1/4 to 3/8 of an inch, around the entire perimeter of the room and around any fixed obstacles like pipes, columns, and door frames. In moisture-prone rooms, erring on the slightly larger side of the recommended gap range gives the floor a bit more room to breathe.
Never push baseboards tight against the laminate surface. The gap must be open so the floor can move freely beneath the baseboard. Nail the baseboard to the wall only and leave it floating just above the floor surface.
For more on how to manage expansion and prevent common laminate installation problems see How to Fix Gaps in Laminate Flooring Before They Get Worse.
Ongoing Moisture Management After Installation
Even with excellent subfloor preparation the floor still needs proper care after installation to stay protected from moisture over the long term.
Keep indoor humidity between 35% and 55% year-round. In moisture-prone rooms use an exhaust fan during and after cooking, bathing, or using appliances that generate steam. Wipe up spills immediately before they can work into the seams between planks. Use a damp mop for cleaning rather than a wet one and never use a steam mop on laminate flooring.
Place waterproof trays under appliances that use water, including dishwashers, washing machines, and refrigerators with ice makers. Even slow drips over time can cause serious moisture damage to the subfloor and the laminate above it.
For a complete seasonal maintenance approach see The Ultimate Flooring Maintenance Checklist.
Final Thoughts
Learning how to prepare subfloor for laminate properly in moisture-prone areas takes more time and attention than a standard dry-room installation, but the extra effort pays off many times over in the performance and lifespan of the finished floor. Testing for moisture, correcting structural issues, leveling subfloor surfaces, and choosing the right laminate flooring underlayment are not optional steps in these environments. They are what make the difference between a floor that holds up beautifully for 20 years and one that shows moisture damage within the first few seasons.
Visit Flooring Outlet & More to explore a full range of laminate flooring options and installation materials including moisture barriers, underlayments, and vapor barriers suited to every subfloor type and environment. Our team is ready to help you choose the right products for your specific room conditions and get your installation started on a solid foundation.
Frequently Asked Questions
Q: Why is subfloor preparation more important for laminate in moisture-prone areas?
A: Laminate's HDF core absorbs moisture vapor from below when the subfloor is not properly prepared. This causes swelling, warping, and joint failure. A properly tested, leveled, and sealed subfloor with the right laminate flooring underlayment prevents these problems before they start.
Q: How do I know if my concrete subfloor has too much moisture for laminate flooring installation?
A: Use a calcium chloride test or a relative humidity probe to measure vapor emission. Most laminate manufacturers require moisture vapor emission rates of 3 to 5 lbs or below and relative humidity of 75% or lower. Always confirm the acceptable threshold in your product's installation guidelines before proceeding.
Q: What is the best laminate flooring underlayment for a moisture-prone room?
A: Choose an underlayment with an integrated vapor barrier rated at 1 perm or lower for moisture-prone environments. Closed-cell foam with an attached polyethylene film works well for most installations. For basements or high-humidity rooms, a standalone 6 to 10-mil polyethylene film used alongside a padded underlayment provides stronger protection.
Q: How flat does my subfloor need to be before laminate flooring installation?
A: Laminate requires a subfloor that is flat within 3/16 of an inch over a 10-foot span. Use a long straightedge to identify high and low spots. Fill low areas with self-leveling compound and grind high spots on concrete. Secure loose plywood panels to eliminate movement before laying any underlayment or flooring.
Q: Does laminate flooring need an expansion gap in moisture-prone rooms?
A: Yes, and the expansion gap is especially important in rooms with humidity fluctuations. Always leave the manufacturer's recommended gap of 1/4 to 3/8 of an inch around the entire room perimeter and around fixed obstacles. In moisture-prone rooms err toward the larger end of that range to give the floor more room to expand without buckling.